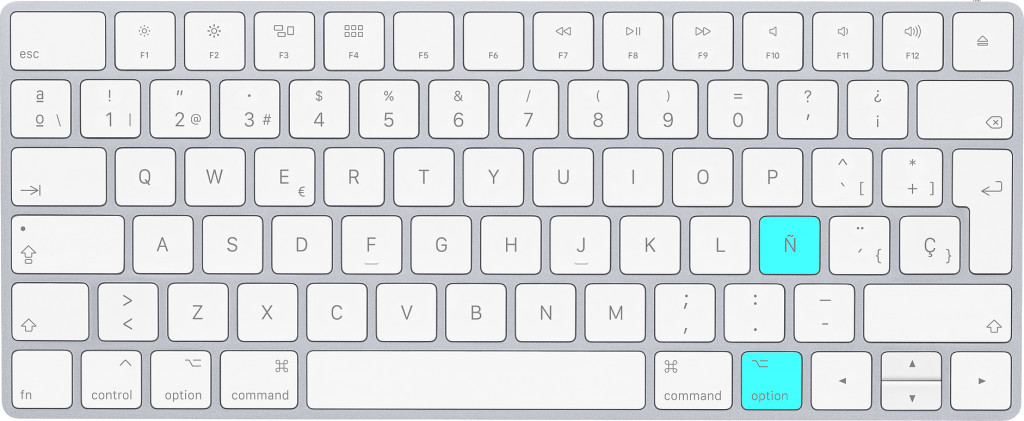
My Spanish keyboard doesn’t have (visually) the hyphen symbol (~). So, if I need to make certain commands like “source ~/.bash_profile” its always a complication to find out how to make the f****** symbol. The combination is “Option/Alt Key + ñ”
Just a personal clipboard …
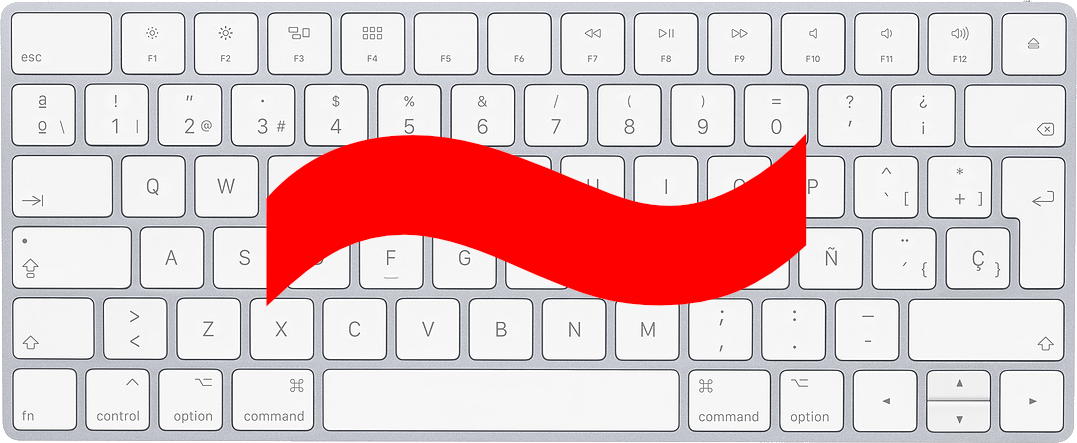
My Spanish keyboard doesn’t have (visually) the hyphen symbol (~). So, if I need to make certain commands like “source ~/.bash_profile” its always a complication to find out how to make the f****** symbol. The combination is “Option/Alt Key + ñ”

Sometimes you need to “save” some important content from YouTube, for example, if you need to make an offline presentation or your internet connection is slow maybe it’s a good idea to download the video before the presentation. Good idea, no?
There are some solution to this, but maybe this is the simples one (for me). With YouTube-dl you can download your videos from YouTube straight from your command line like this
youtube-dl ABCDEF_1234Where ABCDEF_1234 is the “v” param of https://www.youtube.com/watch?v=ABCDEF_1234
(edit) Today this command doesn’t work with this URL https://www.youtube.com/watch?v=-GymG5y0Yt8. You can notice that the param start with a dash symbol (-), so t he program “think” that is a extra flag. To solve this, make sure that you are running the latest version, running:
youTube-dl -UAnd then, pass the entire URL
youtube-dl "https://www.youtube.com/watch?v=-GymG5y0Yt8"That’s all!
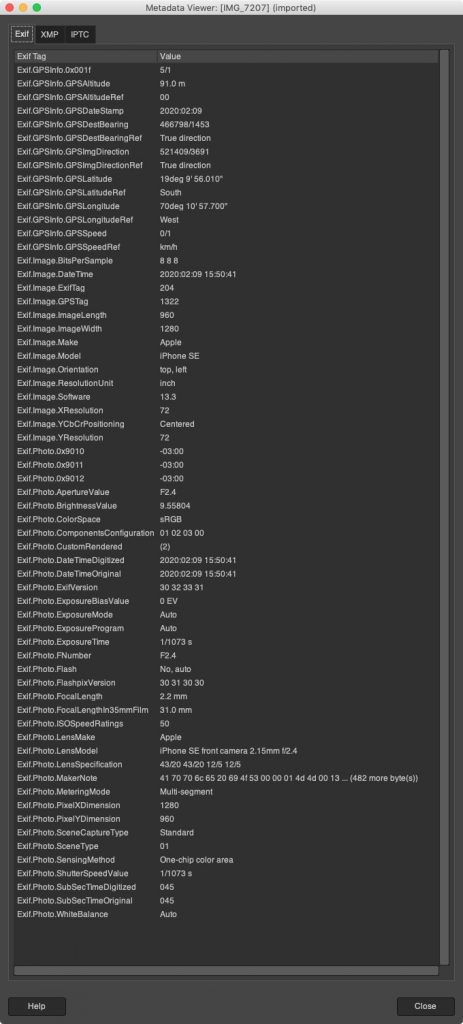
When you take a picture -let say with your phone- a file is created with a lot of information. Most of this represent the image (pixels) itself. But there are another kind of informations that “is” in the picture file: the EXIF.
As an example, I will took a picture with my phone. Then I’ll download to my computer to “explore” what the picture has (apart from the visual information):
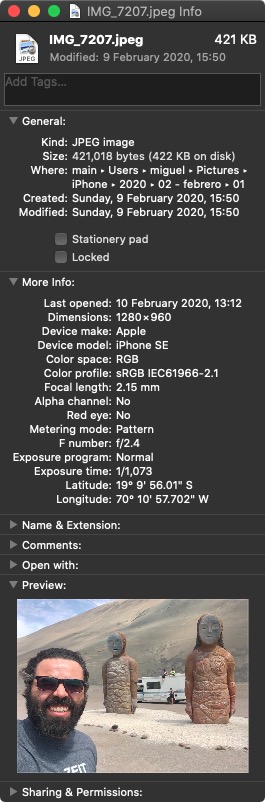
As you can see, a lot of information (that my Mac reveal) is letting me know that this picture was taken with an iPhone SE, the hardware lens config, the date, the resolution, and the most shocking one: the geolocation (latitude and longitude). As you can imagine, a lot of information with a single file.
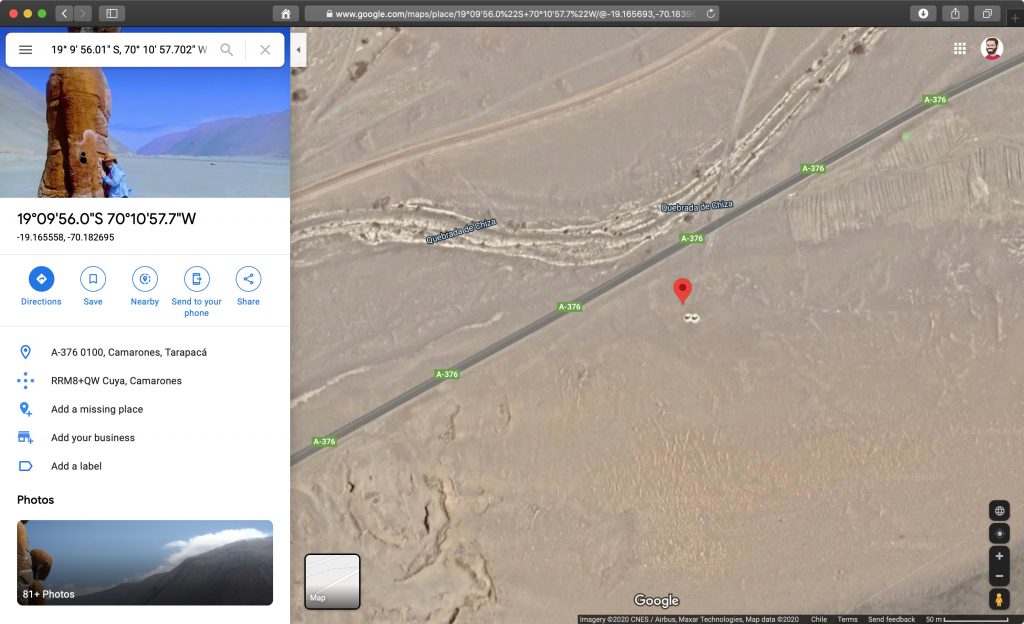
In the example, if I extract the geolocation (19° 9′ 56.01″ S, 70° 10′ 57.702″ W), and paste into Google Maps, you can “go” to the place in where the picture was taken. Cool right? mmmm, Maybe not.
Let say that we need to used a picture, and google-ing we find the right one. We decide to download and used in our webpage (without modifying). Technically, some “algorithms” could find the picture on our website and then analyze the EXIF. You can image what happened next (legally speaking).
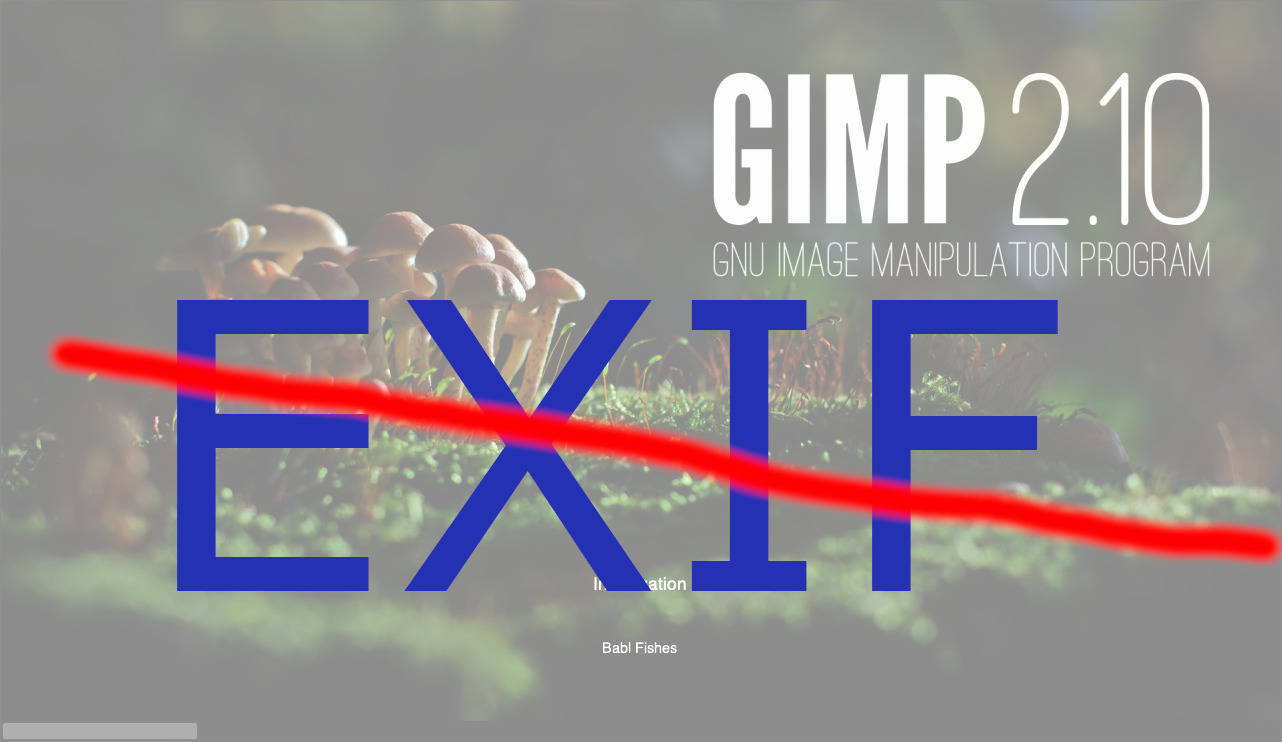
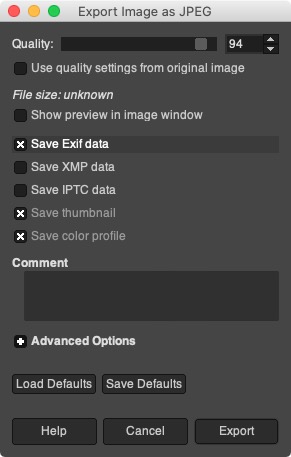
So then, to protect us from that, we can remove the EXIF from the original picture. In this case we can use GIMP, an open source for editing images.
Steps to remove the EXIF:
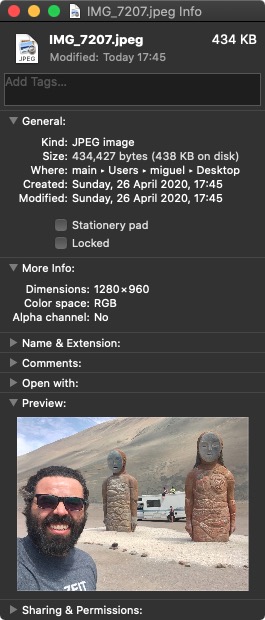
Finally, you will see
If you only want to see the EXIF information of a picture (with GIMP), go to “Image > Metadata > View Metadata”

Create a Model (table representation & his relations)
php artisan make:model {Tabla}Create a Controller (the logic). Name in singular
php artisan make:controller PhotoController --resource // --model=Photo

php artisan make:controller {SingularTableName}

php artisan make:controller API
Create file migration (table blueprint)
php artisan make:migration create_{table}_table
php artisan make:migration {action}_table
Create a Request
php artisan make:request StoreCommentsExternalCreate a file Seeder (to feed tables)
php artisan make:seeder {Tabla}TableSeederProcess only the file database/seeds/{Table}Seeder
php artisan db:seed --class={Table}SeederWhen a table is created and you need to insert a new field, you need to create a new “migration” that only create the new field blueprint.
For example, if you need to insert a new field called “descripcion” to the table “roles”, create a new migration. Edit the file and then run the migration.
php artisan make:migration add_descripcion_to_roles --table="roles" /**
* Run the migrations.
*
* @return void
*/
public function up()
{
Schema::table('roles', function (Blueprint $table) {
$table->timestamp('descripcion')->nullable();
});
}
/**
* Reverse the migrations.
*
* @return void
*/
public function down()
{
Schema::table('roles', function (Blueprint $table) {
$table->dropColumn('descripcion');
});
}php artisan migrateTo go backward (rollback) in the migration
php artisan migrate:rollbackOther Commands
composer require laravel/ui --dev
sudo php artisan ui bootstrap --auth
npm install && npm run dev

php artisan route:list

php artisan cache:clear
php artisan config:clear
php artisan view:clear
php artisan route:cache

composer dump-autoload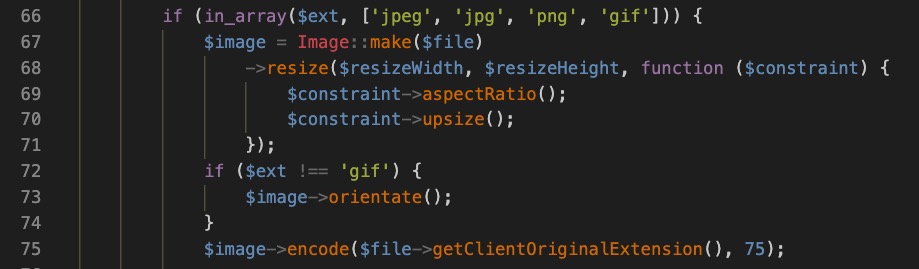
In a side project I’d start using Docker as a better way to go to production. Everything was fine, until an image operation raised (upload & crop images on the server side).
In this project I’m using Laravel as a backend, and a popular package for manipulate images is “intervention/image“. In the oficial documentation, it mention that you need to have the GD Library extension in your server (with JPG support).
I was using this Dockerfile
FROM php:7.2-apache

RUN apt-get update

# 1. development packages
RUN apt-get install -y \
    git \
    zip \
    curl \
    sudo \
    nano \
    unzip \
    libicu-dev \
    libbz2-dev \
    libpng-dev \
    libjpeg-dev \
    libmcrypt-dev \
    libreadline-dev \
    libfreetype6-dev \
    g++

# 2. apache configs + document root
ENV APACHE_DOCUMENT_ROOT=/var/www/html/public
RUN sed -ri -e 's!/var/www/html!${APACHE_DOCUMENT_ROOT}!g' /etc/apache2/sites-available/*.conf
RUN sed -ri -e 's!/var/www/!${APACHE_DOCUMENT_ROOT}!g' /etc/apache2/apache2.conf /etc/apache2/conf-available/*.conf

# 3. mod_rewrite for URL rewrite and mod_headers for .htaccess extra headers like Access-Control-Allow-Origin-
RUN a2enmod rewrite headers

# 4. start with base php config, then add extensions
RUN mv "$PHP_INI_DIR/php.ini-development" "$PHP_INI_DIR/php.ini"

RUN docker-php-ext-install \
    bz2 \
    intl \
    iconv \
    bcmath \
    opcache \
    calendar \
    mbstring \
    exif \
    gd \
    pdo_mysql \
    zip

# 5. composer
COPY --from=composer:latest /usr/bin/composer /usr/bin/composer

# 6. we need a user with the same UID/GID with host user
# so when we execute CLI commands, all the host file's ownership remains intact
# otherwise command from inside container will create root-owned files and directories
ARG uid
RUN useradd -G www-data,root -u $uid -d /home/devuser devuser
RUN mkdir -p /home/devuser/.composer && \
    chown -R devuser:devuser /home/devuser && \
    chown -R devuser /home/devuser/.composer/
But when I spin up the container and enter to the VM, in the CLI execute:
php -r 'print_r(gd_info());'The result was:
Array
(
    [GD Version] => bundled (2.1.0 compatible)
    [FreeType Support] => 1
    [FreeType Linkage] => with freetype
    [GIF Read Support] => 1
    [GIF Create Support] => 1
    [JPEG Support] =>
    [PNG Support] => 1
    [WBMP Support] => 1
    [XPM Support] =>
    [XBM Support] => 1
    [WebP Support] =>
    [BMP Support] => 1
    [JIS-mapped Japanese Font Support] =>
)
You can notice that [JPEG Support] wasn’t 1.
To fix this, I add this code to the Dockerfile
RUN docker-php-ext-configure gd --with-freetype-dir=/usr/include/ --with-jpeg-dir=/usr/include/ \
+    && docker-php-ext-install gd
and remove
gd \So, the final Dockerfile now is
FROM php:7.2-apache

RUN apt-get update

# 1. development packages
RUN apt-get install -y \
    git \
    zip \
    curl \
    sudo \
    nano \
    unzip \
    libicu-dev \
    libbz2-dev \
    libpng-dev \
    libjpeg-dev \
    libmcrypt-dev \
    libreadline-dev \
    libfreetype6-dev \
    g++

# 2. apache configs + document root
ENV APACHE_DOCUMENT_ROOT=/var/www/html/public
RUN sed -ri -e 's!/var/www/html!${APACHE_DOCUMENT_ROOT}!g' /etc/apache2/sites-available/*.conf
RUN sed -ri -e 's!/var/www/!${APACHE_DOCUMENT_ROOT}!g' /etc/apache2/apache2.conf /etc/apache2/conf-available/*.conf

# 3. mod_rewrite for URL rewrite and mod_headers for .htaccess extra headers like Access-Control-Allow-Origin-
RUN a2enmod rewrite headers

# 4. start with base php config, then add extensions
RUN mv "$PHP_INI_DIR/php.ini-development" "$PHP_INI_DIR/php.ini"

RUN docker-php-ext-configure gd --with-freetype-dir=/usr/include/ --with-jpeg-dir=/usr/include/ \
    && docker-php-ext-install gd

RUN docker-php-ext-install \
    bz2 \
    intl \
    iconv \
    bcmath \
    opcache \
    calendar \
    mbstring \
    exif \
    pdo_mysql \
    zip

# 5. composer
COPY --from=composer:latest /usr/bin/composer /usr/bin/composer

# 6. we need a user with the same UID/GID with host user
# so when we execute CLI commands, all the host file's ownership remains intact
# otherwise command from inside container will create root-owned files and directories
ARG uid
RUN useradd -G www-data,root -u $uid -d /home/devuser devuser
RUN mkdir -p /home/devuser/.composer && \
    chown -R devuser:devuser /home/devuser && \
    chown -R devuser /home/devuser/.composer/
With this, running again the php commando to see the gd_info(), the result is
Array
(
    [GD Version] => bundled (2.1.0 compatible)
    [FreeType Support] => 1
    [FreeType Linkage] => with freetype
    [GIF Read Support] => 1
    [GIF Create Support] => 1
    [JPEG Support] => 1
    [PNG Support] => 1
    [WBMP Support] => 1
    [XPM Support] =>
    [XBM Support] => 1
    [WebP Support] =>
    [BMP Support] => 1
    [JIS-mapped Japanese Font Support] =>
)sudo find ./ -type d -exec chmod 775 {} +zip -r {filename.zip} {foldername}
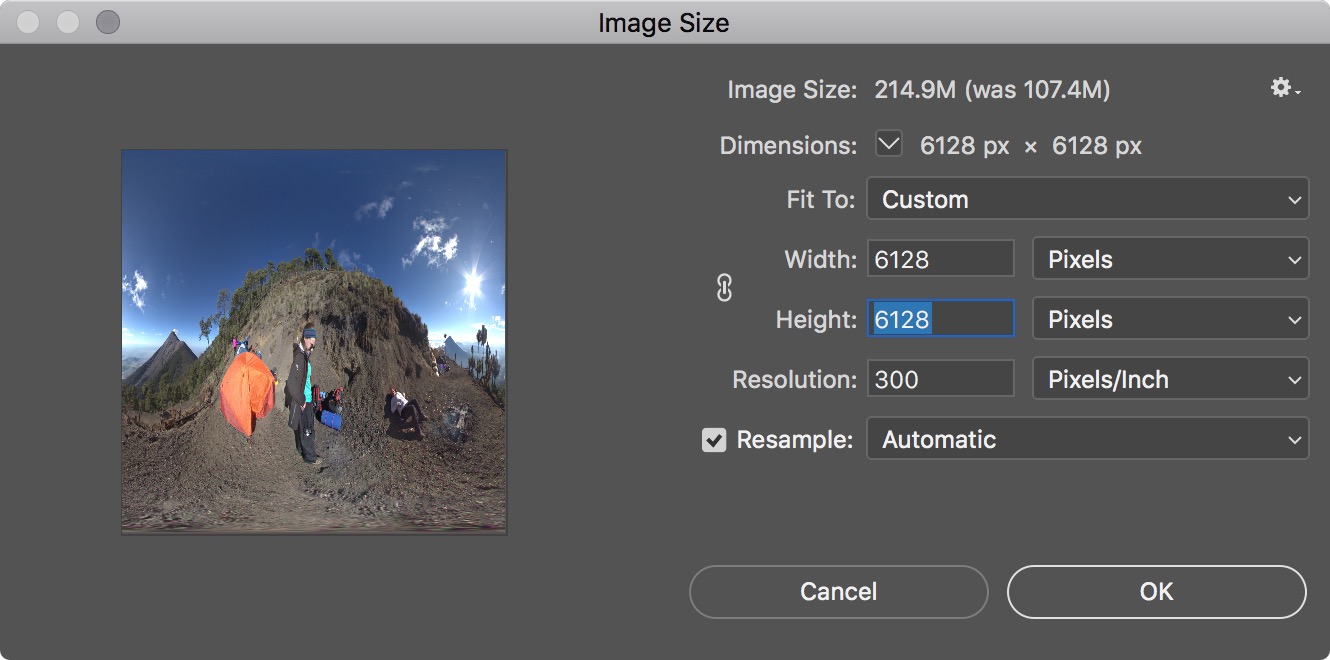
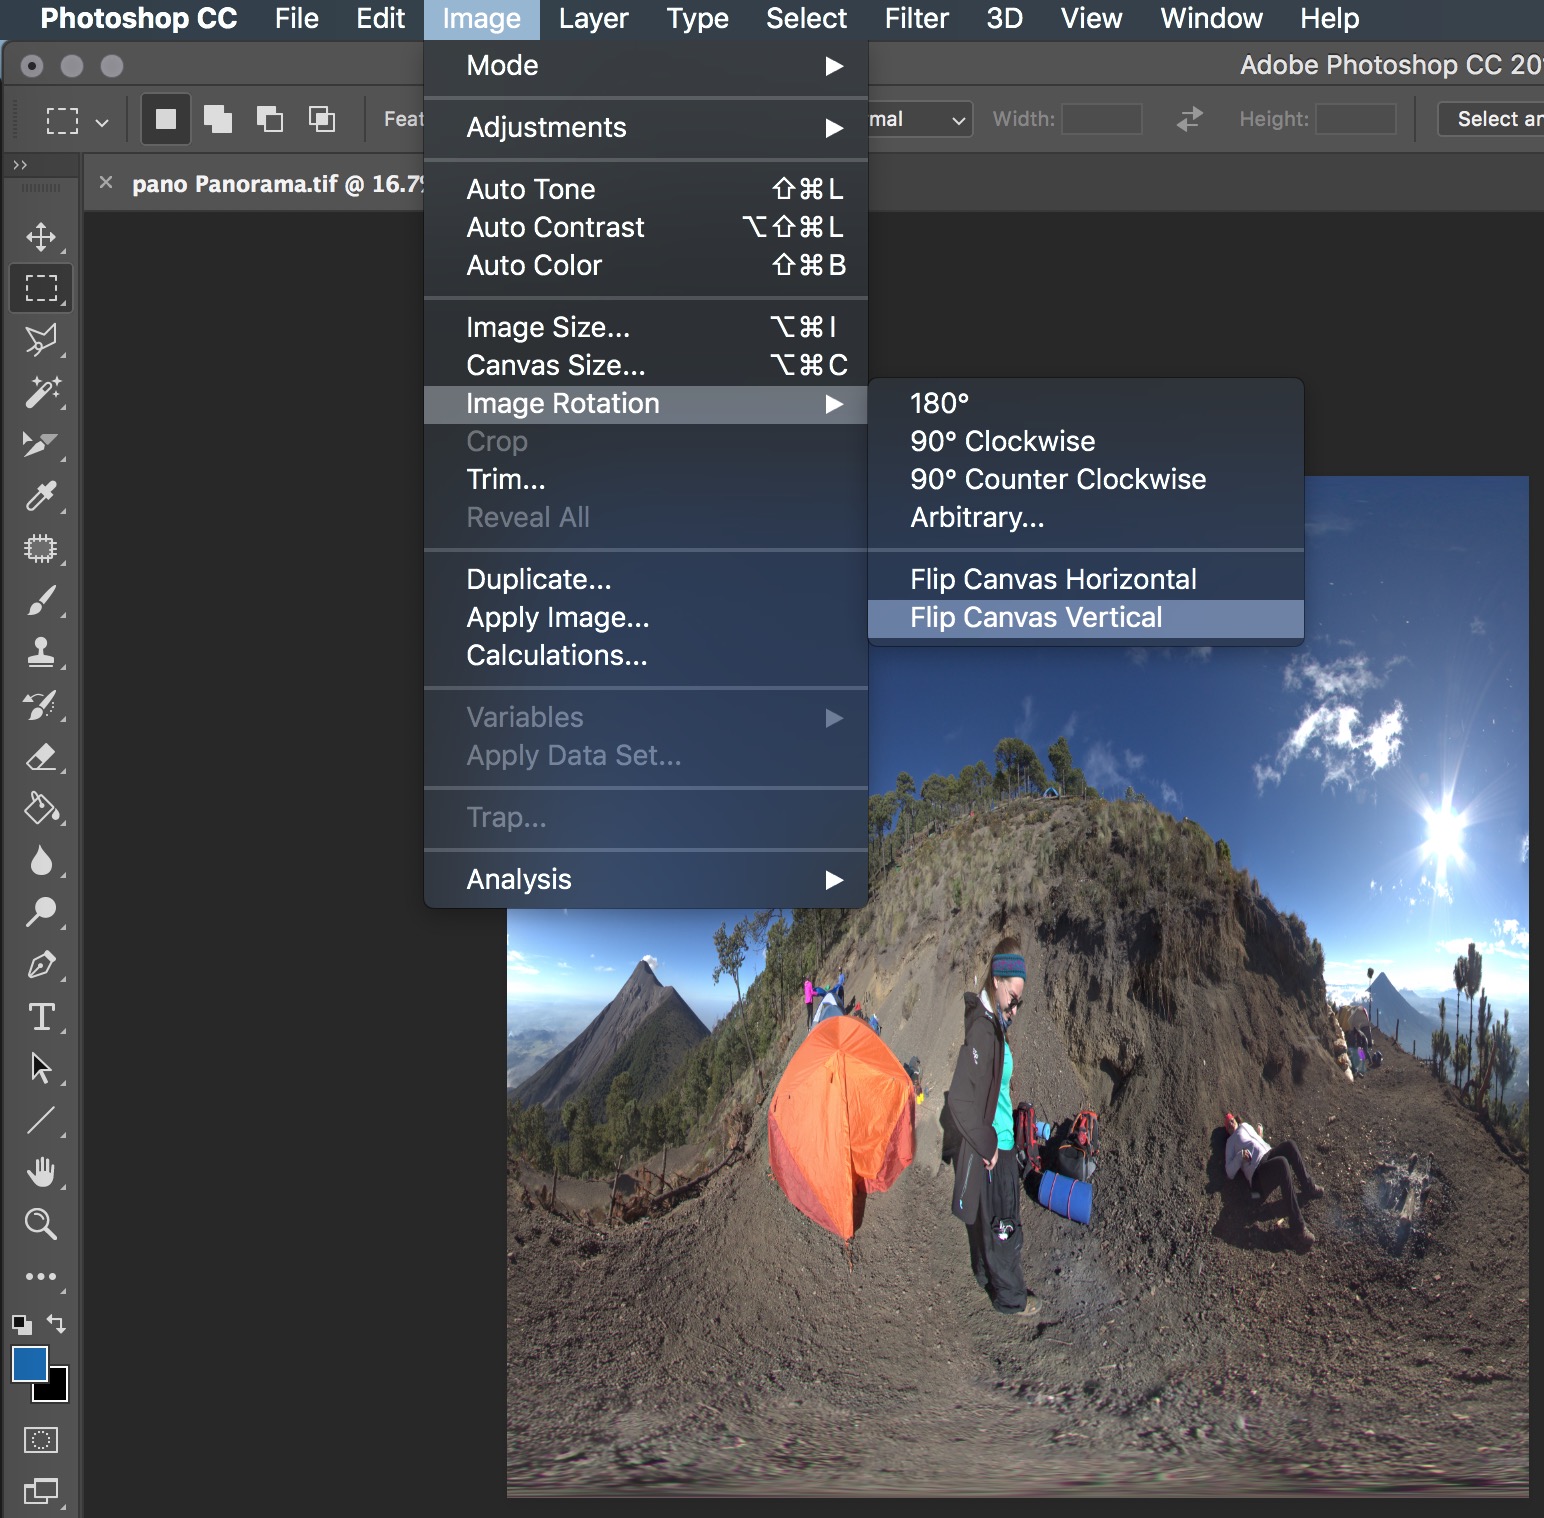
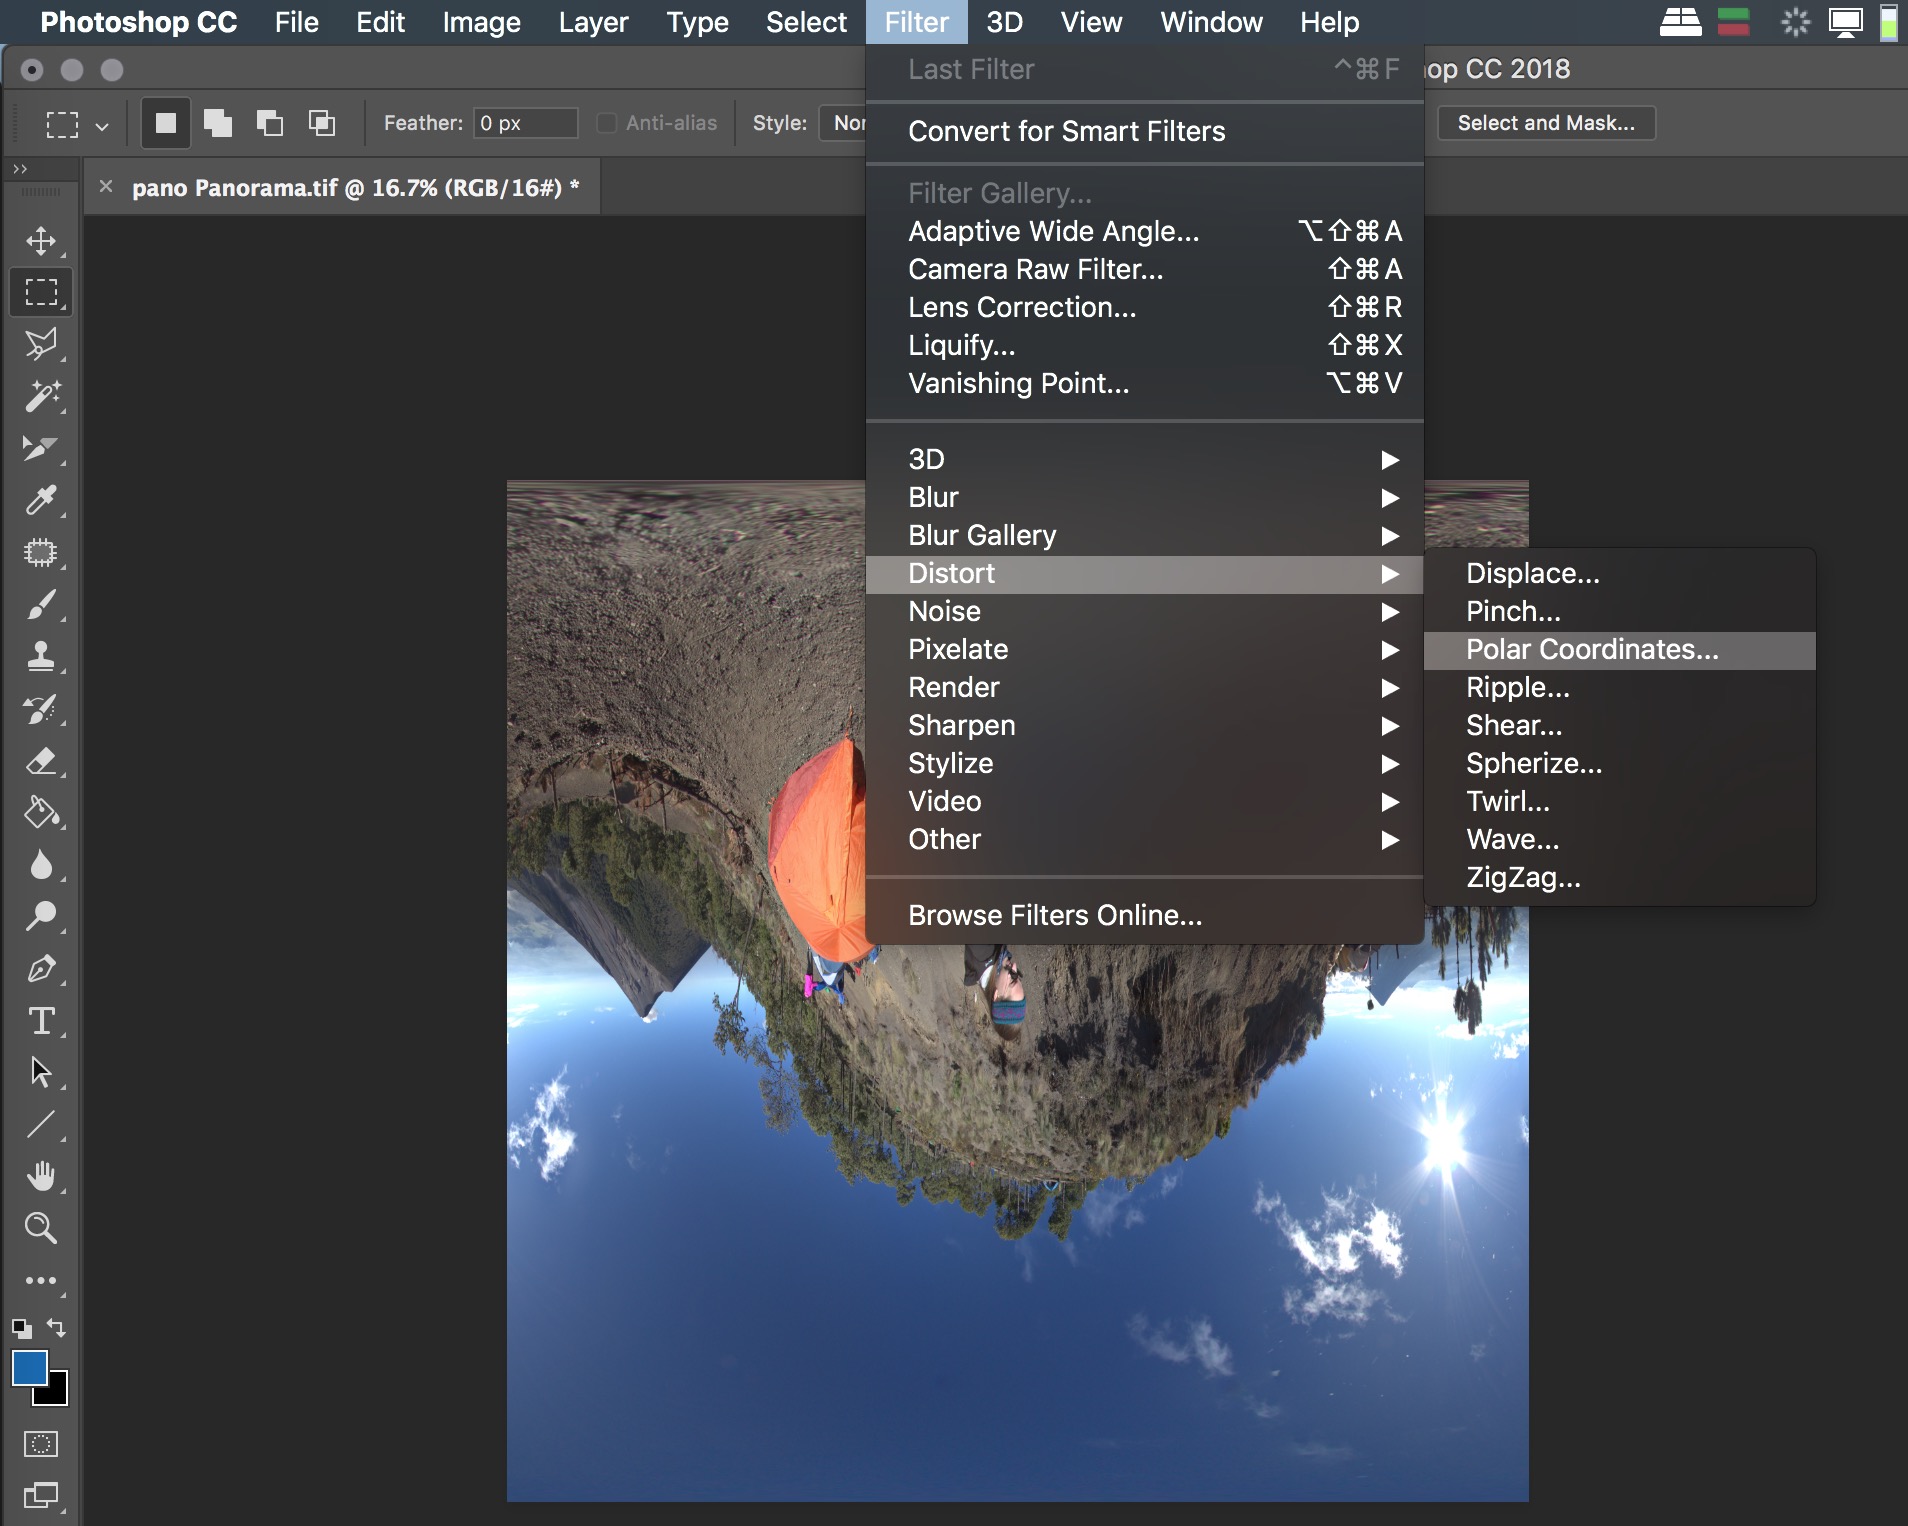
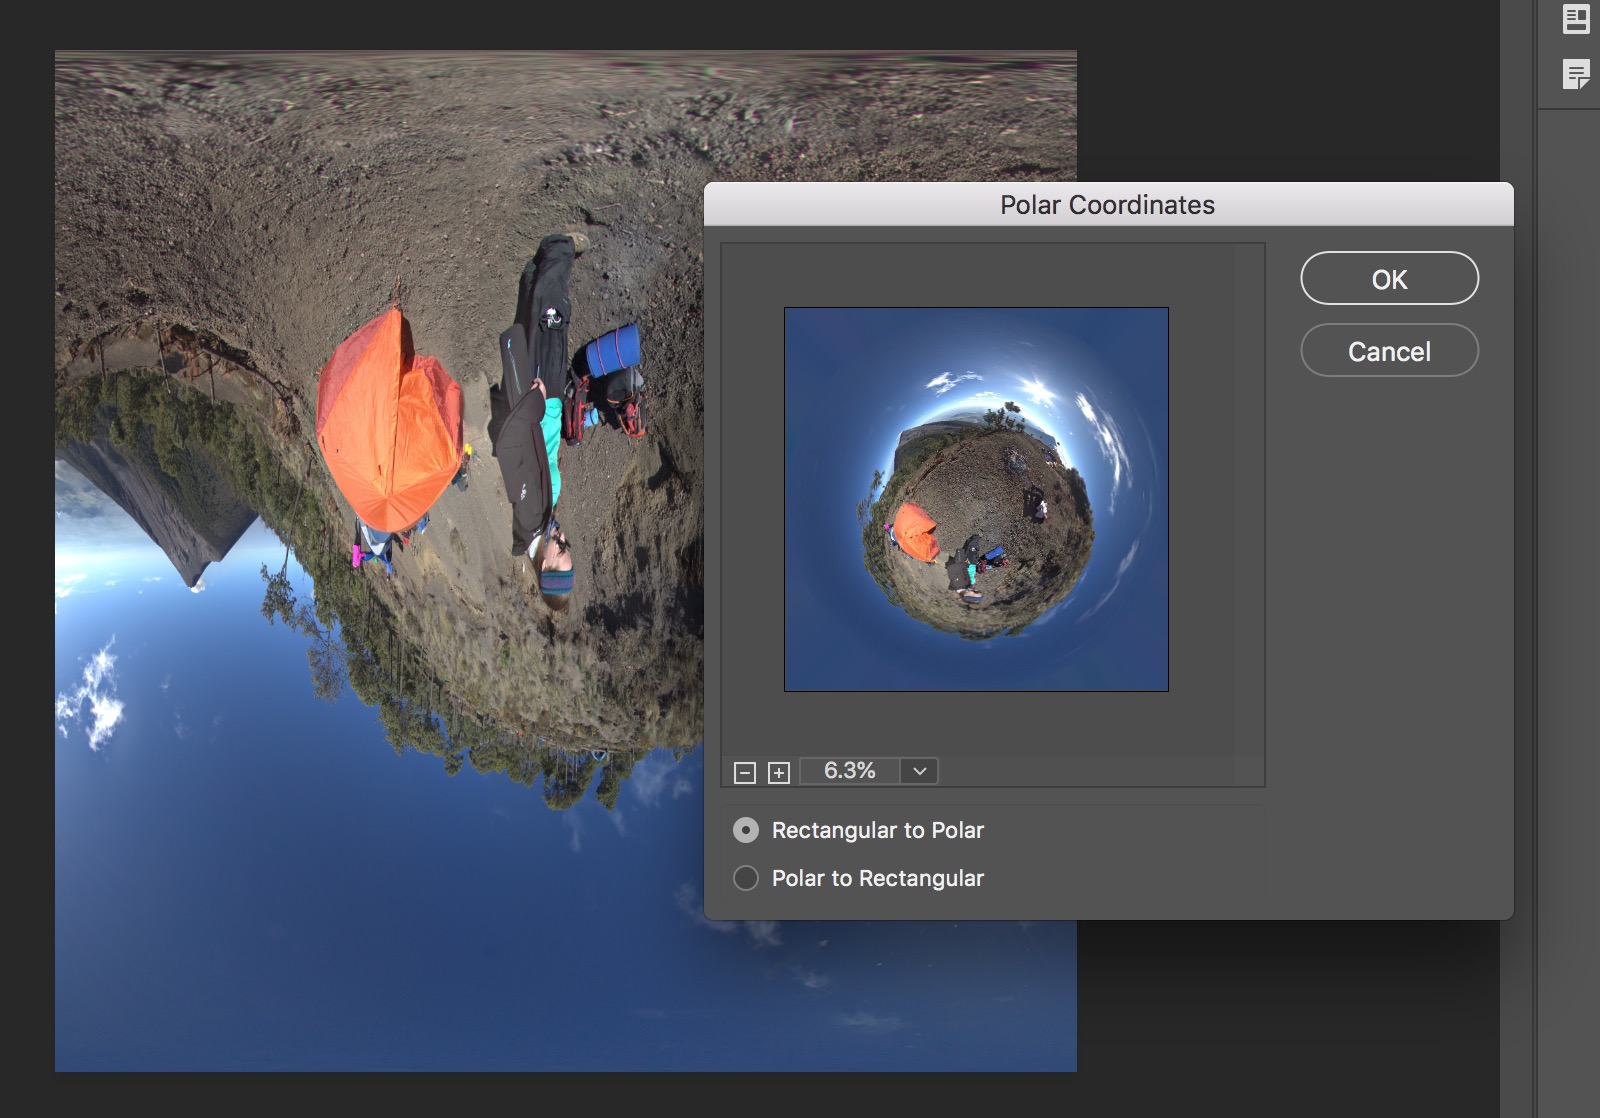
Assuming that you have an equirectangular image, these are the steps:
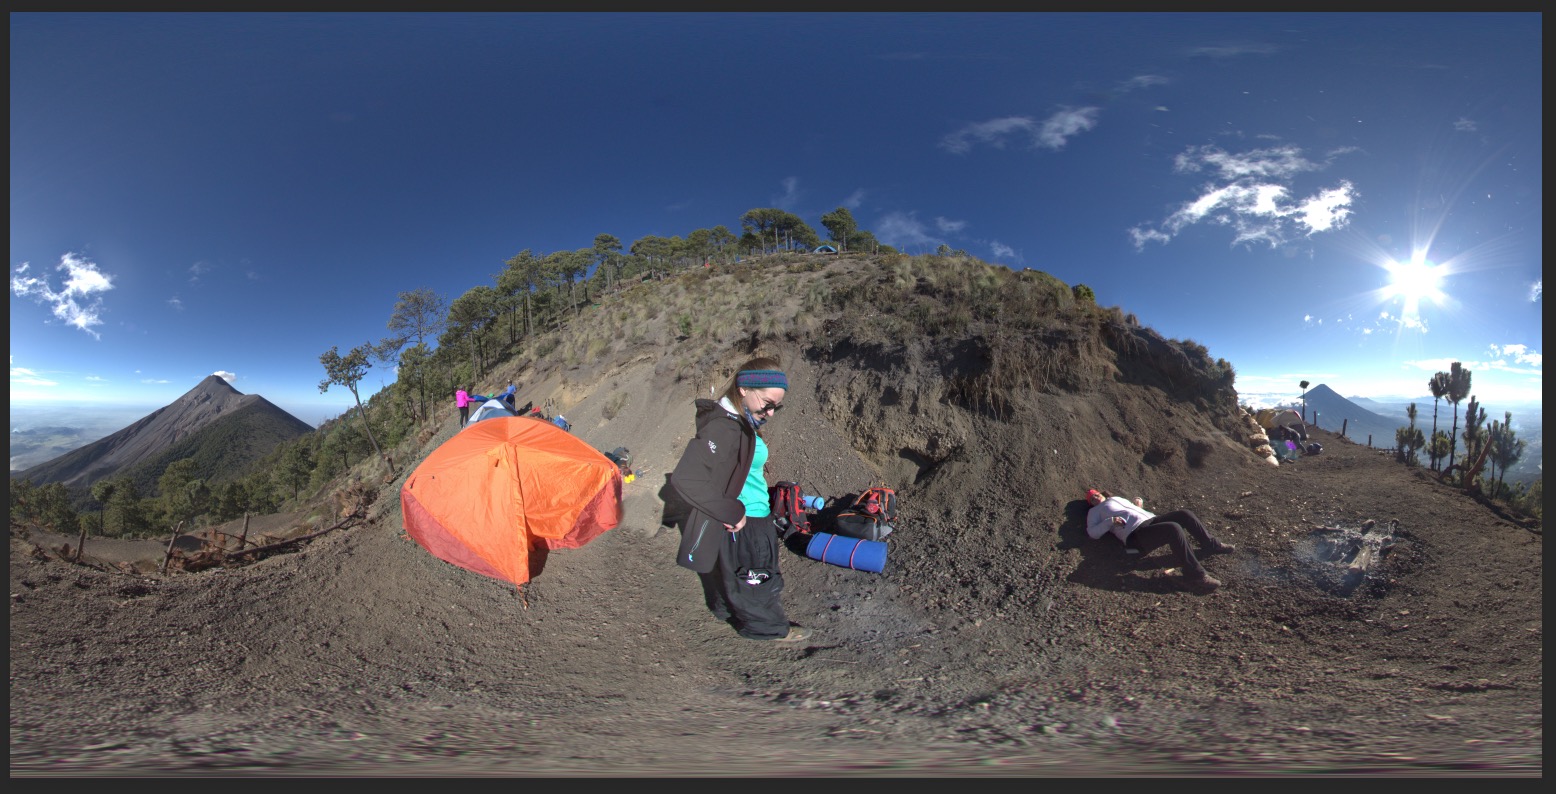
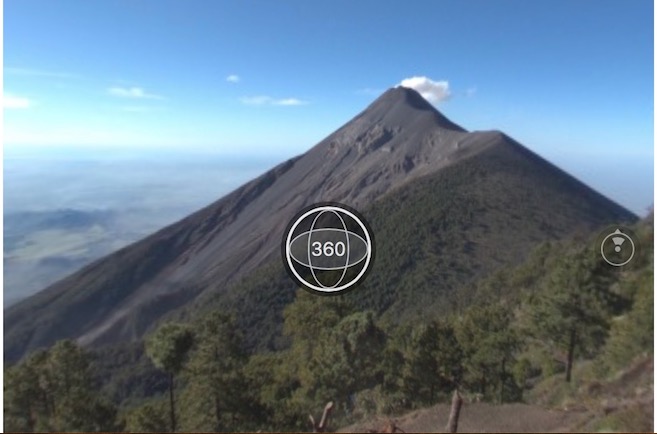
By default, when you upload a picture to facebook it will upload as a normal one. But, how we can tell to Facebook that our picture is a panorama? Well, there is not an option to do that, so we need to make a trick. The trick is modify the EXIF of the resulting equirectangular image that we will upload. In my case I convert from TIFF to JPG to reduce the file size. Then, with the help of an application call “imageExifEditorFree” we can change the “camera” name and the “model”:
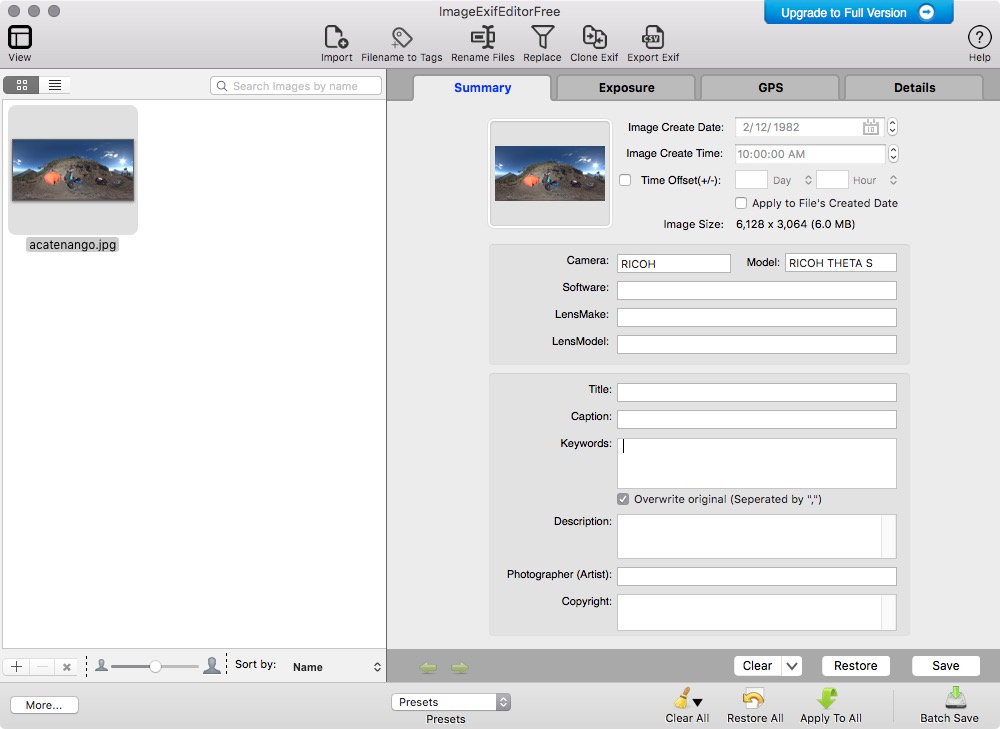
Set the camera name to “RICOH” and the model to “RICOH THETA S” and save.
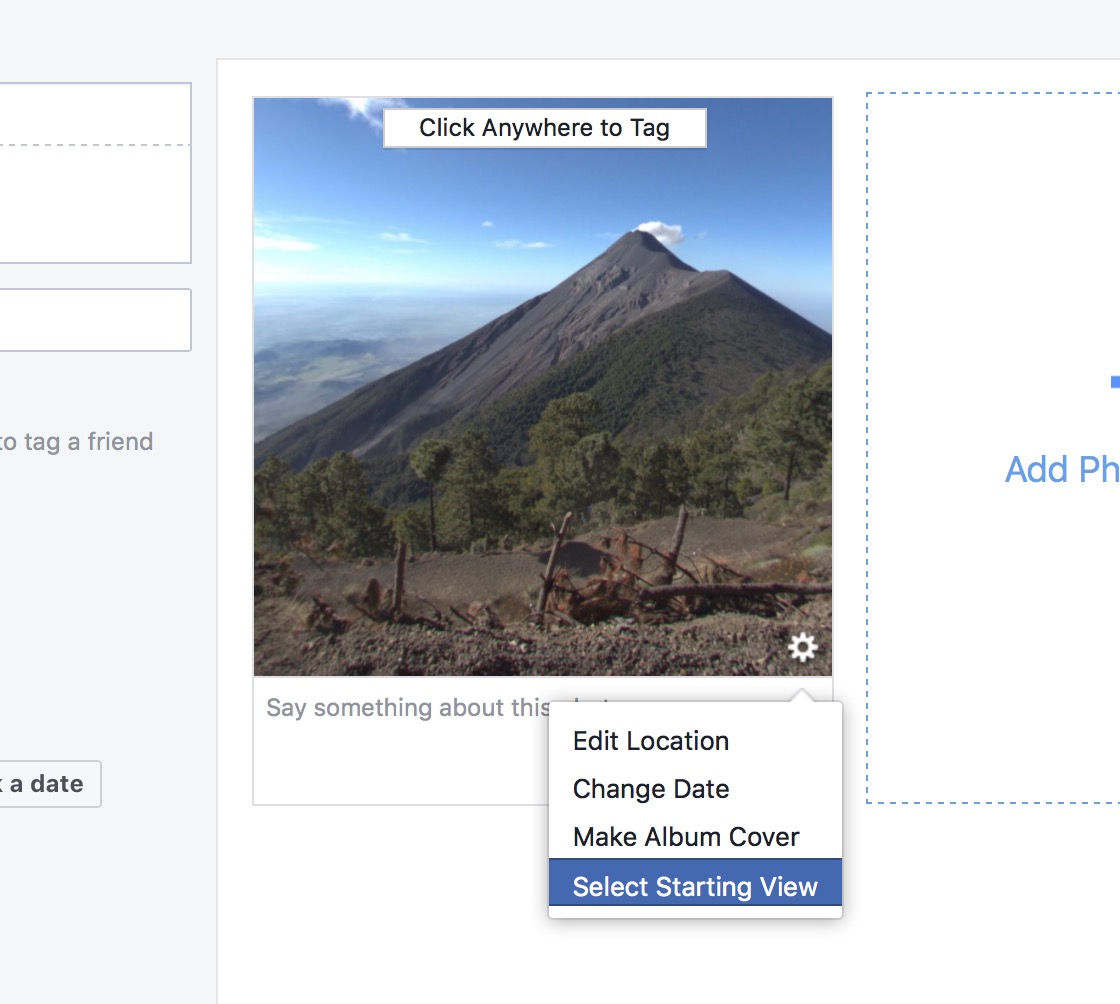
Now, Facebook will recognize as a panorama image:
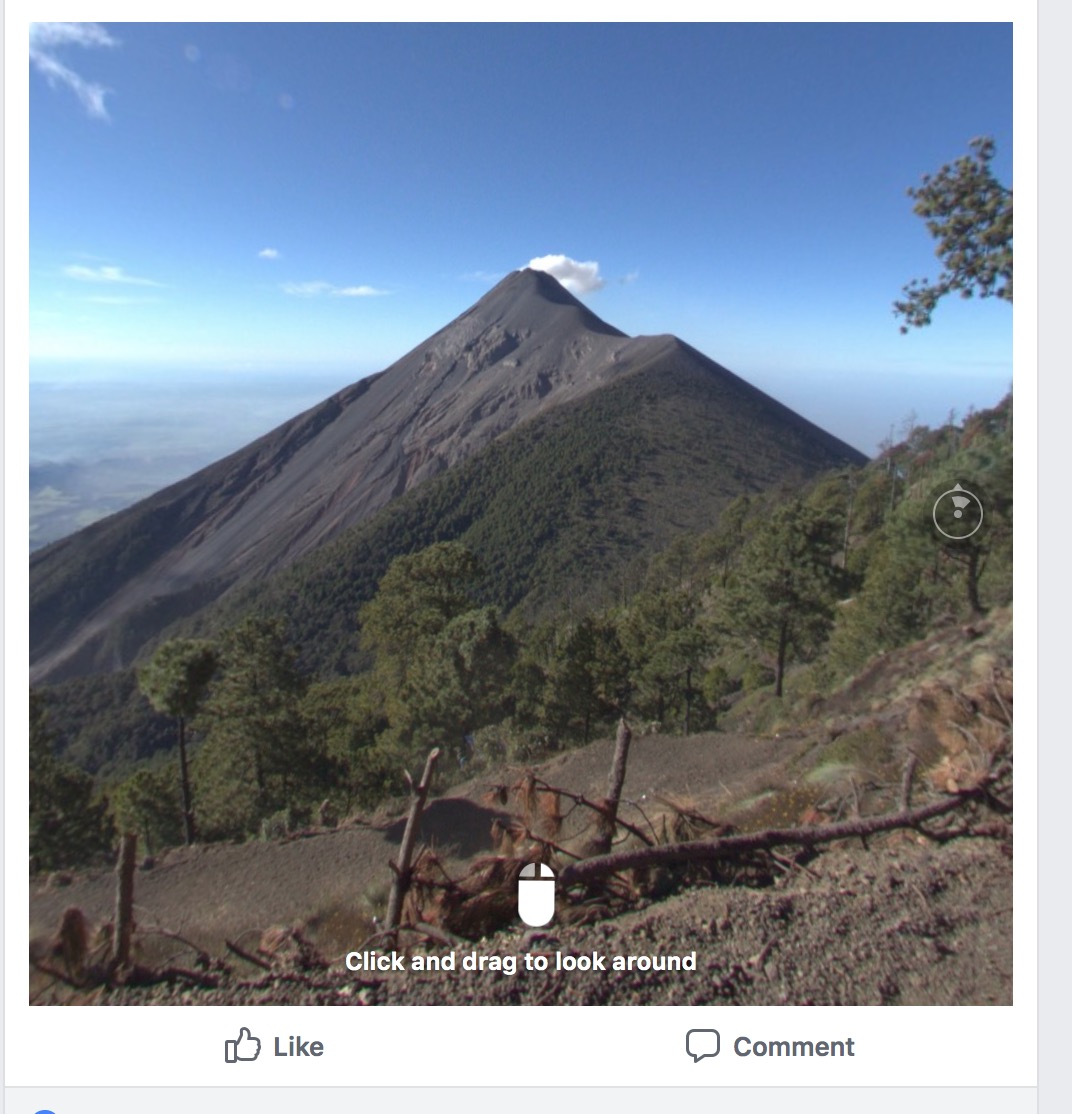
Finally, how your friend will see the image:
You just need to download -in this case- Mojave OS in your HD. Once you’ve download, connect an USB flash drive (more than 8GB storage) and run:
sudo /Volumes/miguel/Software/Install\ macOS\ Mojave.app/Contents/Resources/createinstallmedia --volume /Volumes/CHEMA --nointeractionwhere /Volumes/miguel/Software is the OS folder location and /Volumes/CHEMA is the USB